2023年2月17日 星期五

在 Linux 下對 USB 外接 SSD 執行 fstrim

參考連結,Enable Trim on an External SSD on Linux,Fixing Storage Adapters for Raspberry Pi via Firmware Updates。

為了保持 SSD 的效能,在使用一陣子後,必須執行 fstrim,將刪除的 block 回收。但是 USB 外接硬碟盒不一定支援 unmap 的功能,目前 (2022) 可能只有 VIA 的晶片才支援,而且要稍微費一些功夫才能執行 fstrim。

參考

在  Gentoo 下,要安裝 sys-apps/sg3_utils,並且只支援 USB3,USB2 不能用。

買的時候,參考 ArchLinux 的 wiki,選擇 Orico 的外接硬碟盒,使用的晶片是 VIA 的 VL716。

以下整段抄自 ArchLinux 的 wiki,經測試 OK。

Several USB-to-SATA bridge chips (like VL715, VL716 etc.) and also USB-to-PCIe bridge chips (like the JMicron JMS583 used in external NVMe enclosures like IB-1817M-C31) support TRIM-like commands that can be sent through the USB Attached SCSI driver (named "uas" under Linux).

But the kernel may not automatically detect this capability, and therefore might not use it. Assuming your block device in question is /dev/sdX, you can find out whether that is the case by using the command

# sg_readcap -l /dev/sdX

If in its output you find a line stating "Logical block provisioning: lbpme=0" then you know that the kernel assumes the device does not support "Logical Block Provisioning Management" because the (LBPME) bit is not set.

If this is the case, then you should next find out whether the "Vital Product Data" (VPD) page on "Logical Block Provisioning" of your device tells of supported mechanisms for unmapping data. You can do this using the command:

# sg_vpd -a /dev/sdX

Look for lines in the output that look like this:

Unmap command supported (LBPU): 1
Write same (16) with unmap bit supported (LBPWS): 0
Write same (10) with unmap bit supported (LBPWS10): 0

This example would tell you the device supports the "UNMAP" command.

Have a look at the output of

$ cat /sys/block/sdX/device/scsi_disk/*/provisioning_mode

If the kernel did not detect the capability of your device to unmap data, then this will likely return "full". Apart from "full", the kernel SCSI storage driver currently knows the following values for provisioning_mode:

unmap
writesame_16
writesame_10
writesame_zero
disabled

For the example above, you could now write "unmap" to "provisioning_mode" to ask the kernel to use that:

# echo "unmap" >/sys/block/sdX/device/scsi_disk/*/provisioning_mode

This should immediately enable you to use tools like "blkdiscard" on /dev/sdX or "fstrim" on filesystems mounted on /dev/sdX.

If you want to enable a "provisioning_mode" automatically when an external device of a certain vendor/product is attached, this can be automated via the "udev" mechanism. First find the USB Vendor and Product IDs:

$ cat /sys/block/sdX/../../../../../../idVendor
$ cat /sys/block/sdX/../../../../../../idProduct

Then create or append to a udev rule file (example here using idVendor 152d and idProduct 0583):

# echo 'ACTION=="add|change", ATTRS{idVendor}=="152d", ATTRS{idProduct}=="0583", SUBSYSTEM=="scsi_disk", ATTR{provisioning_mode}="unmap"' >>/etc/udev/rules.d/10-uas-discard.rules

(You can also use the lsusb command to look for the relevant idVendor/idProduct.)

簡要說明

假設偵測到的外接 SSD 是 sde。

# cat /sys/block/sde/device/scsi_disk/*/provisioning_mode
full
# echo "unmap" >/sys/block/sde/device/scsi_disk/*/provisioning_mode
# cat /sys/block/sde/device/scsi_disk/*/provisioning_mode
unmap
# fstrim -v /mnt/ssd
/mnt/ssd: 270.7 GiB (290687594496 bytes) trimmed

大概如上。

2023年1月10日 星期二

OpenSCAD 學習

最完整的介紹說明,是 良葛格的網頁 https://openhome.cc/zh-tw/openscad/。不幸的是,我想要學 OpenSCAD,找到良葛格的介紹文章時,他已驟然病逝,享年 48歲,真是相遇不逢時,也為英才早逝感到惋惜。

詳細的指令說明可以參考 <OpenSCAD CheatSheet>,很單純,就層層疊疊的,再東削西挖的,把東西建構出來,有點像 DIY 做一個物件。

為了開心放心的使用免費的 3D建構軟體,先學 123D Design,後來改學參數式設計的 FreeCAD,最後學習 OpenSCAD。

一般會問 OpenSCAD 好不好學,好不好用? 答案是非常非常不好學,不好用,不直覺。那為何要用它? 因為 ....

首先,用 FreeCAD,可以用參數來建構物件,但是這參數怎麼來的,只有建的當下知道。可能是算出來的,也可能只是高興這樣設,也許是不想讓程式顯示還有 DoF,就隨便設一個,方便檢查是不是 Fully constrained。

其次,在 Part Design 中,一個物件一定要全部黏在一起,組合件只能分開設計。先設計好一個,再設計另一個。在建構後者時,必需打開前者,看看相對的參數為何。有的要一樣,嚙合的部分要加減一點,這個尤其困擾,讓人不知道怎麼來的。

所以,使用 OpenSCAD,就是為了文件化,抄的時候,比較清楚要改那裡,要怎麼改。

另外,它的 module 功能,可以全部建出來後,再做加工,如 mirror,一次就把兩個建出來了。FreeCAD 當然也行,但我不熟,用得不好,因為要切換 workbench。

檢視 stl 檔案的工具 -- fstl,測量 stl 檔案的工具 -- admesh。

2022年12月21日 星期三

新電腦安裝 (Gentoo) - 2022年12月


----------------------
比較執行 time emerge  portage 所花的時間

## 原來的電腦
CPU: Intel(R) Core(TM) i9-9900K CPU @ 3.60GHz (family: 0x6, model: 0x9e, stepping: 0xc)

real 0m32.807s
user 0m23.179s
sys 0m12.093s

## 新的電腦
CPU: 11th Gen Intel(R) Core(TM) i7-11700 @ 2.50GHz (family: 0x6, model: 0xa7, stepping: 0x1)

real 0m12.307s
user 0m9.705s
sys 0m3.753s
----------------------


2022年12月15日 星期四

Arch-Linux 安裝

原來是使用 Gentoo,但是有些電腦只是拿來做普通的事情,要等待漫長的安裝和更新 ,是不切實際的。使用 Ubuntu 一陣子覺得不習慣,改試 Arch-Linux,好像和 Gentoo 比較接近,網路資源很豐富,就改用這個吧。

網路 IP 設定

# ln -sf /usr/share/zoneinfo/Asia/Taipei /etc/localtime
# pacman -S grub
# grub-install --target=i386-pc /dev/sda
# grub-mkconfig -o /boot/grub/grub.cfg
# useradd -G wheel,audio,video -m ajax

# pacman -S networkmanager dhcpcd openssh
# systemctl start NetworkManager

# ip link set dev enp1s0 up
# ip a add 192.168.0.176/24 dev enp1s0
# ip route add default via 192.168.0.1

pacman -S xorg-server

pacman -S xfce4
# 一定要裝 lightdm-gtk-greeter 才能啟動
pacman -S lightdm lightdm-gtk-greeter

# 音效
pacman -S pulseaudio
pacman -S extra/pavucontrol
pacman -S extra/xfce4-pulseaudio-plugin

# 安裝 Nvidia 專有驅動,安裝後 nouveau 應會自動被黑名單。
pacman -S nvidia-dkms nvidia-utils

# 可以安裝純文字工具 nvtop, 用於查看顯示卡使用率
pacman -S nvtop

# 為了執行 appimage
pacman -S fuse

# 升級有衝突時
pacman -Sud

設定時區 (使用 systemd)
# timedatectl set-timezone Asia/Taipei
# timedatectl set-ntp yes
# timedatectl set-local-rtc no

必須安裝 nvidia-dkms,才能依據 linux-headers 安裝對應 kernel 的 module。更新後,會自動重新產生 initramfs。

網路連線,可以使用 systemd-networkd.service 或 NetworkManager.service。

加快更新速度

更新時,出現下載速度太慢的問題
Operation too slow. Less than 1 bytes/sec transferred the last 10 seconds

使用下列方式,更新 /etc/pacman.d/mirrorlist

# 安裝 reflector
$ sudo pacman -S reflector

# 測試,會自動更新 mirrorlist
$ sudo reflector --verbose --latest 10 --protocol https --sort rate --save /etc/pacman.d/mirrorlist

# 然後執行更新
$ sudo pacman -Syu

目前台灣穩定且常用的鏡像站有:

## Taiwan
Server = https://archlinux.cs.nycu.edu.tw/$repo/os/$arch
Server = https://mirror.archlinux.tw/ArchLinux/$repo/os/$arch
Server = https://ftp.tku.edu.tw/Linux/ArchLinux/$repo/os/$arch
Server = https://mirrors.ntut.edu.tw/archlinux/$repo/os/$arch

最快的是 https://taipei.mirror.pkgbuild.com 和 https://geo.mirror.pkgbuild.com。

固定 IP

------
# /etc/systemd/network/50-static.network
[Match]
Name=enp5s0
 
[Network]
Address=10.161.89.102/20
#Address=10.161.88.102/20
Gateway=10.161.80.1
------

更改 IP 後,執行 “sudo networkctl reload”,即可套用新的 IP。

中文輸入法

使用 Fcitx 5 中文輸入

# 安裝 Fcitx 5 核心與輸入法引擎
$ sudo pacman -S fcitx5-im fcitx5-chewing fcitx5-table-extra

# 在設定檔加入下列環境變數 及 登入自動啟動
--------- export GTK_IM_MODULE=fcitx export QT_IM_MODULE=fcitx export XMODIFIERS=@im=fcitx $ fcitx5 -d
------------------


使用 AUR

# Using AUR
git clone https://aur.archlinux.org/pkgName.git
cd pkgName/
makepkg

安裝 yay
sudo pacman -S --needed base-devel git
git clone https://aur.archlinux.org/yay.git
cd yay
makepkg -si


# 使用 Yay – Yet another Yogurt
yay -S pkgName         ## 安裝
yay -Ss pkgName        ## 搜尋
yay -S pkgName=ver.xx  ## 安裝特定版本
要安裝 wine ==> why not simply enable multilib repo in pacman.conf and install the required libraries?

加速 yay 編譯的速度,makepkg#Parallel compilation

xrdp 設定

-----------------------
$ yay -S aur/xrdp aur/xorgxrdp

# 修改 /etc/xrdp/sesman.ini 中 [Xorg] 的區段的 param 參數
param=/usr/lib/Xorg

# 啟動 xrdp
sudo systemctl start xrdp
sudo systemctl enable xrdp
-----------------------

在個人的目錄下,建立 .xinitrc,內容如下

-----------------------
#!/bin/sh

exec dbus-launch --sh-syntax startxfce4
-----------------------

並且將其設成可執行 chmod a+x .xinitrc。


vmware-workstation

# pacman -S linux-headers
$ yay -S  --needed  vmware-workstation15
# modprobe -a vmw_vmci vmmon
# systemctl start vmware-networks
# systemctl start vmware-usbarbitrator
# systemctl start vmware-hostd

安裝 chrome-remote-desktop,下載時出現 404

網友回覆如下

----------------------------

All,

From comments in the Gentoo net-misc/chrome-remote-desktop ebuild:

# Use curl to find the answer:
#  curl -q https://dl.google.com/linux/chrome-remote-desktop/deb/dists/stable/main/binary-amd64/Packages | grep ^Filename

As of 15:50 US Eastern Standard Time on 2023/3/3, the current version is:

pool/main/c/chrome-remote-desktop/chrome-remote-desktop_111.0.5563.12_amd64.deb

HTH :)

Clemmitt Sigler

--------------------------------

--------------------------------
# pacstrap -K /mnt base linux linux-firmware
error: openssl: signature from "Pierre Schmitz <pierre@archlinux.org>" is marginal trust
:: File /mnt/var/cache/pacman/pkg/openssl-3.0.8-1-x86_64.pkg.tar.zst is corrupted (invalid or corrupted package (PGP signature)).
Do you want to delete it? [Y/n] 

==== 修正 ====
# pacman -Sy archlinux-keyring
==== 還是失敗 ====
# pacman-key --init
--------------------------------

更新的問題

太久沒更新,導證憑證過期,無法更新。

參考 https://wiki.archlinux.org/index.php/Pa … mport_keys

 出現的錯誤如下:

:: Proceed with installation? [Y/n] error: i3-wm: signature from "Thorsten Töpper <atsutane@freethoughts.de>" is unknown trust
:: File /var/cache/pacman/pkg/i3-wm-4.11-1-x86_64.pkg.tar.xz is corrupted (invalid or corrupted package (PGP signature)).
Do you want to delete it? [Y/n] error: failed to commit transaction (invalid or corrupted package (PGP signature))

可行方法之一是執行下面的指令,但可能沒用,而且可能花很久的時間。

sudo pacman-key --refresh-keys

解決辦法之一 https://bbs.archlinux.org/viewtopic.php?id=281914。ue:

# rm -rf /etc/pacman.d/gnupg
# pacman-key --init
# pacman-key --populate archlinux
# pacman -Sy archlinux-keyring

後來解決了。

安裝舊版的 AUR package

從 AUR package 的 [View Changes] 連結,找到要的版本,點擊那個版本,然後再切換到 [tree],會列出所有的檔案。建立目錄,再手動下載所有的檔案。下載之後,執行 makepkg -si 安裝軟體。

SUDO 執行視窗程式

出現錯誤 

$ sudo gparted

Authorization required, but no authorization protocol specified

(gpartedbin:21759): Gtk-WARNING **: 03:30:28.744: cannot open display: :10.0

修正

$ export XAUTHORITY=.Xauthority

在 wine 下,執行 becky mail 32 位元程式,只要設 成  windows 10,即可透 WOW 執行。

-------
sudo pacman -S wine wine-gecko wine-mono
WINEPREFIX=~/wine-becky winecfg
export WINEPREFIX=~/wine-becky
wine "C:\\Apps\\BeckyMail-2.83.01\\B2.exe"
--------

中文亂碼(豆腐塊),直接從你原來的 Windows 系統(或上網下載)取得 msjh.ttc(微軟正黑體)或 mingliu.ttc(新細明體),並將字型檔複製到 Wine 的字型目錄下即可:

cp /路徑/到/msjh.ttc ~/.wine/drive_c/windows/Fonts/


2022年12月8日 星期四

PhpStorm 試用

PhpStorm 是開發 PHP 程式的非常好用的程式,在 2021.1.4 版本之前,不用申請授權即可試用,之後則要申請試用的授權。這裡收集了網路上關於可以延長試用的方式,留作參考。

ide-eval-resetter  (僅適用 2021.1.4 版本)

 PhpStorm 的試用期為一個月,可能不足以了解其功能,想要延長其使用期限,有人提供了此功能。但該公司非常積極的防堵使用者各種揩油的途徑,後來的試用就改成必需申請才能用囉。因此這種裝好就能用的版本只到 2021.1.4 版本,之後就只能另想辦法了。

在此特別記錄一下當作參考。

PhpStorm 2021.1.4 is released -- PHP 2021.1.4 的 release note。支援到 PHP 8.0。

Jetbrains系列产品重置试用方法[归档] -- 說明,本项目已过时,自2021.2.3开始不再推荐使用。请支持正版!


0x1. 如何安装

1). 插件市场安装:

在Settings/Preferences... -> Plugins 内手动添加第三方插件仓库地址:https://plugins.zhile.io

搜索:IDE Eval Reset插件进行安装。如果搜索不到请注意是否做好了上一步?网络是否通畅?

插件会提示安装成功。

2). 下载安装:

点击这个链接(v2.3.5)下载插件的zip包 (ide-eval-resetter-2.3.5-c80a1d.zip)。(macOS可能会自动解压,然后把zip包丢进回收站)

通常可以直接把zip包拖进IDE的窗口来进行插件的安装。如果无法拖动安装,你可以在Settings/Preferences... -> Plugins 里手动安装插件(Install Plugin From Disk...)

插件会提示安装成功。

其實,這程式很單純的就只是把 eval 檔刪掉而已。

rm -rf ~/.${PRD}*/config/eval
rm -rf ~/.config/${PRD}*/eval
rm -rf ~/.config/JetBrains/${PRD}*/eval

不裝插件,直接手動刪也可以。

使用 ja-netfilter.jar

說實在的,我並不清楚這個東西是在做什麼,只是照著做,試試看能不能試用。試用結果是 2023.2 版本可以試用。詳情不多說,可以試著搜尋 uninstall-current-user.vbs,就能找到相關的作法。


2022年11月24日 星期四

在 CentOS 6.9 安裝 Intel 网卡 I219-V (rev 11)


lspci 顯示裝置為 "Ethernet controller: Intel Corporation Device 1a1d (rev 11)"

在新的 OS,如 Ubuntu 20 下顯示 "Ethernet controller: Intel Corporation (17) I219-V (rev 11)"

先前裝的是  e1000e-3.4.2.1,載入 e1000e 的 driver,並沒有抓到網卡。使用 Ubuntu 20 來測試,一樣使用 e1000e 的 driver,則可以抓到網卡。

後來在網路上看到有人的 NAS 換新網卡後,無法運作,用 eeupdate 把  I219-V 改成  I219-LM,就可以正常運作了。

 EEupdate 修改 Intel 网卡类型,參考 

因此就開始努力搜尋 eeupdate 工具,最後發現這是 Intel 發佈的工具,只有合約廠商才可以使用,可以用來設定主機板上的 MAC address。因此網路上大都要認證才可以下載,而且大都是舊的版本,連網卡都認不得。

後來找到一個,照著把 8086:1A1D 改成 8086:1A1C,但最後卡在寫入很久,可能是寫入錯誤,好在後來重開正常,應該是完全沒有寫進去。而且後來看了 Intel 的 e1000e 的驅動程式原始碼,發現這樣改根本沒用,所以沒成功算是運氣不錯,否則網卡可能就廢掉了。

在 e1000e-3.4.2.1 原始碼的 pci.updates 檔案中列出支援的裝置 ID,最後一版的 I219-V 是 "8086:15bc  Ethernet Connection (7) I219-V","8086" 是 Intel Corporation 的 vendor id。也可以看出 I219-LM 和 I219-V 都是同時發佈,差一號。

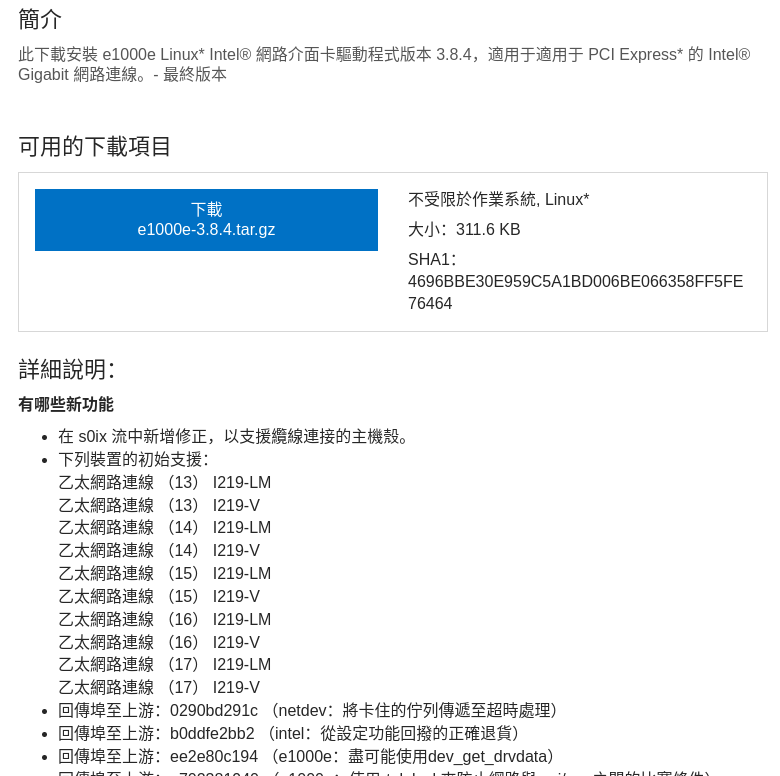
再慢慢找答案,發現 Intel 提供的最近版本是 e1000e-3.8.4,下載的網頁就明白標示支援 "乙太網路連線 (17) I219-V",

所以下載新的原始碼,一樣修改編譯錯誤的地方,就能成功安裝。

https://sourceforge.net/p/e1000/bugs/656/
編譯 e1000e 3.8.4,netdev.c 有一行程式要改
原來
struct net_device netdev = pci_get_drvdata(to_pci_dev(dev));

修改成

struct net_device netdev = pci_get_drvdata(pdev);

-


2022年11月23日 星期三

Windows Server 2019 (IIS 10) 設定 reverse proxy

 Windows Server 2019,IIS 10, 設定 reverse proxy

需安裝「IIS URL Rewrite Module 2」及「Microsoft Application Request 3.0」

進入 IIS 管理員,最頂層的網站,點選 Application Request Routing Cache,再點選右側動作的 Server Proxy Setting,把 Enable proxy 打勾就好,其他的都不要改。

然後在 「預設的網站 (Default Web Site)」,點選 URL Rewrite,再點選右側動作的「新增規則」。不要選「反向 Proxy」,這會把整個網頁導到反向代理的頁面。要自己分別新增空白的輸入規則和輸出規則,比較安全。

輸入規則,模式「ag-rdp/(.*)」,重作屬性->重寫URL「http://10.161.81.162:32771/guacamole/{R:1}」

輸出規則,模式「 ^http(s)?://10.161.81.162:32771/guacamole/(.*)」,重作屬性->值「http{R:1}://ag-rdp/{R:2}」


網誌存檔